Australian Off Road Enters Administration After 26 Years of Australian Manufacturing
Caloundra, Queensland — 15 September 2026

After more than 25 years of designing and manufacturing Australian-made off-road campers and caravans, Australian Off Road (AOR) has entered administration, bringing to a close one of the Sunshine Coast’s best-known specialist manufacturing businesses.

Founded by Stephen (Steve) Budden in 2000, AOR began as a small operation in Budden’s carport in Maleny before moving to Caloundra and growing into a substantial Australian manufacturer. Over the following quarter-century, the company developed a reputation for premium, genuinely off-road products and built a loyal 4000 strong customer base across Australia and internationally.

At its peak, AOR had grown from a one-man operation into a major Sunshine Coast manufacturing business employing around 100 people and operating from a purpose-built factory and showroom. The company celebrated its 25th anniversary in 2025 and reported building approximately 250 caravans during that year, including units delivered to customers in Australia and the United States.

AOR’s success was reflected in numerous industry and business awards, including multiple Camper Trailer of the Year awards, Sunshine Coast and Caloundra business awards, and, most recently, the 2025 Caravan Industry Association of Australia RVMAP People’s Choice Manufacturer of the Year – Gold award. (Australian Offroad)

Despite that long record of success, the business has faced an increasingly difficult operating environment.

AOR’s General Manager, says the company has been subjected to intensifying product copying, with competitors reproducing concepts, features and design approaches developed through years of AOR’s engineering and product development. At the same time, the market has experienced significant price pressure from increasingly sophisticated Chinese imports, making it increasingly difficult for a premium Australian manufacturer to compete on price while maintaining Australian manufacturing, employment and quality standards.

The company has also faced growing competition from manufacturers operating in lower-cost parts of Australia, particularly southern states where lower wage and property rental costs can provide a significant structural cost advantage over manufacturing on Queensland’s Sunshine Coast.

For a business committed to Australian manufacturing, these pressures have created an increasingly difficult commercial equation: customers continue to value Australian design, engineering and construction, but the market has become increasingly price-driven.

> “AOR was never simply a business to us. It was a passion for building products that could withstand the toughest conditions Australia could throw at them and provide exceptional back up service and warranty at the same time,” Mr Budden said.

> “What started in a carport in Maleny grew into a business that employed hundreds of people and their families over its lifetime, supported Australian suppliers and trades, and gave thousands of families the opportunity to explore Australia in luxury, comfort and security.”

> “We are immensely proud of what we achieved. Unfortunately, the manufacturing environment has changed dramatically. Competing against imported products on price, while also facing competitors with substantially lower manufacturing overheads, has made it increasingly difficult to sustain the business in its existing form.” 

AOR’s history is one of innovation and persistence. Its Odyssey camper became the foundation of the business, while later products including the Quantum and Matrix helped establish AOR as a major name in the Australian off-road camping market. The Quantum was the first Australian designed Hybrid in Australia and the start of the entire Hybrid market, a design that changed the Australian market forever.  The company’s products have received national recognition for their engineering, off-road capability and workmanship. (Australian Offroad)

The closure is therefore not simply the end of a company, but the end of a significant chapter in Australian recreational vehicle manufacturing.

AOR management acknowledges the disappointment and uncertainty facing employees, customers, suppliers, dealers and the broader AOR community. The administration process will determine the future of the company’s assets, outstanding obligations and any potential continuation or sale of the business.

After 26 years of operation, Australian Off Road leaves behind a substantial legacy of Australian design and manufacturing, a highly recognised product range, and an exceptionally loyal community of customers who have taken AOR campers and caravans to some of the most remote parts of Australia and beyond.

SET UP OPERATION

Try to choose a site where your trailer can be positioned on reasonably level ground. This assists with levelling the trailer and will make sleeping more comfortable.

If adjustment is necessary across the width of the trailer, drive the trailer’s downhill wheel up onto a chock prior to detaching the trailer from the vehicle. Use a small spirit level to assist you.

After uncoupling the trailer, wind the jockey wheel handle up or down to level it along its length. Once the trailer has been levelled, lower the rear legs and front legs and adjust for support.


Raising The Pop Top Roof (Quantum, Quantum Plus, Odyssey and Matrix Pop Top Models Only)

  1. Loosen the black wheel behind the front and rear awning leg
  2. Lift the grey lever on front and rear awning leg
  3. Pull down latch at top or rear awning drum
  4. Firmly grasp white awning drum strap and pull down and outwards approximately 60cms
  5. Undo all 6 silver roof latches (4 for the Odyssey)
  6. Open the door and step inside the trailer, taking care that the door does not come into contact with the awning drum
  7. Push up on the 2 lift arms until roof is fully raised
  8. Using the 2 pins (found in the top vanity drawer) insert one into each of the holes in the roof lifters
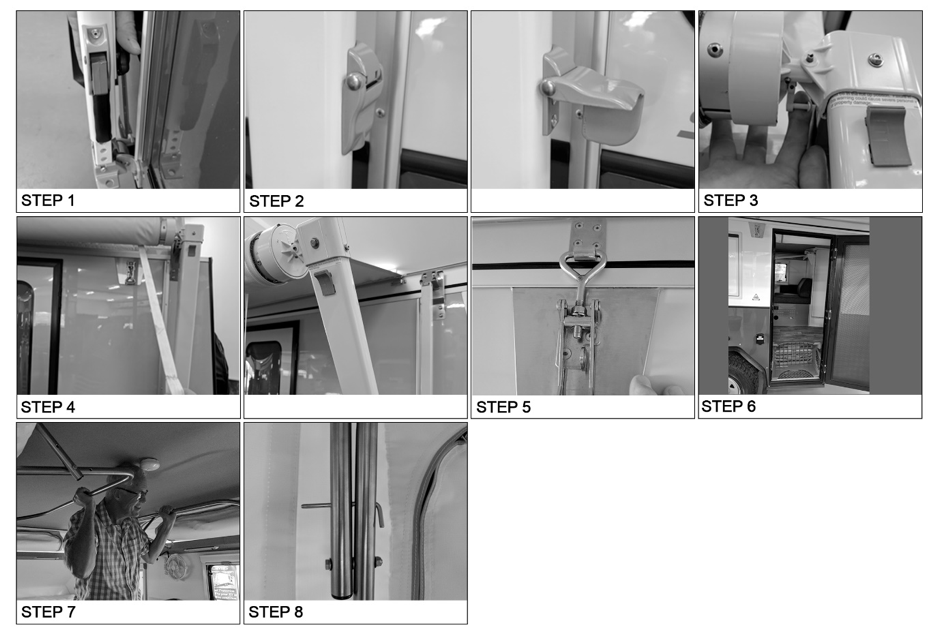
aor raising pop top roof set up steps

Lowering The Pop Top Roof (Quantum, Quantum Plus, Odyssey and Matrix Pop Top Models Only)

  1. Make sure the trailer door is open
  2. Make sure the shower arm is down
  3. Repeat set up steps outlined above in reverse
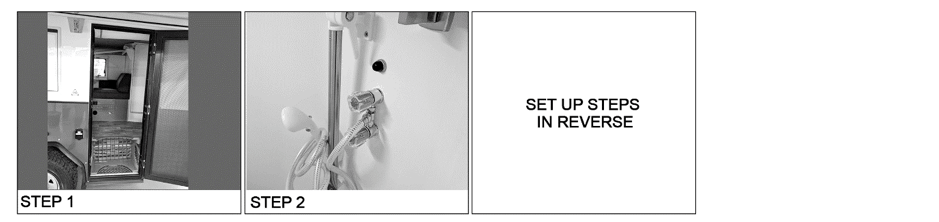
aor lowering pop top roof set up steps

Awning Setup – Awning Out Legs Attached To Trailer

Note: Roof must be raised before awning is set up

  1. Loosen the black wheel behind front and rear awning leg
  2. Lift up grey lever on front and rear awning leg
  3. Pull down latch found at top of rear awning drum
  4. If anti-flap device is to be fitted, awning needs to be fully extended so hole near drum is exposed
  1. Once desired awning length is achieved, tighten front and rear black wheel
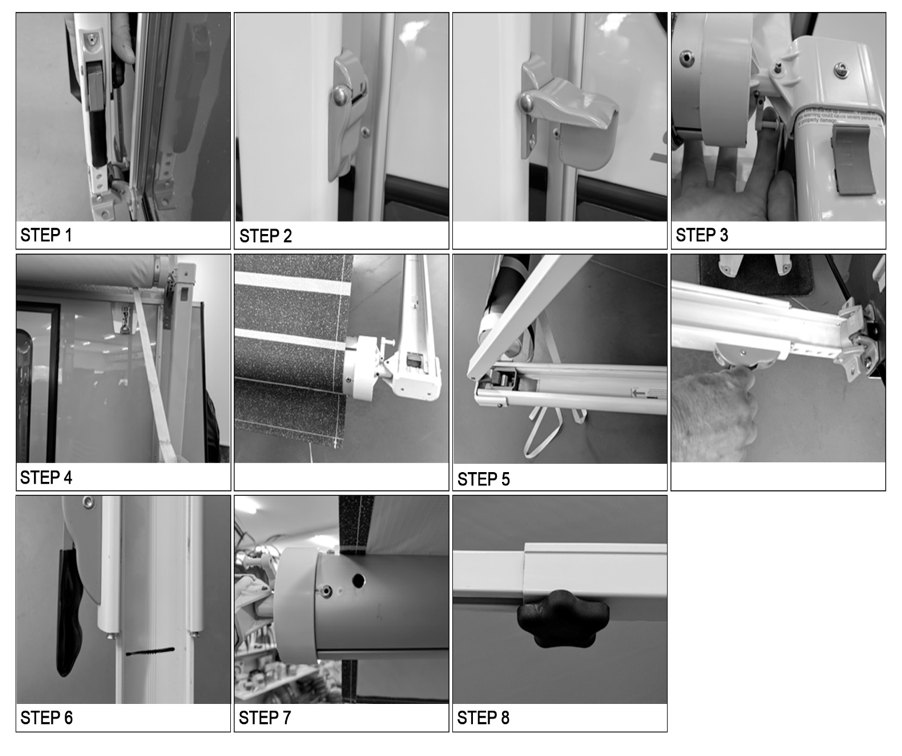
aor awning setup steps

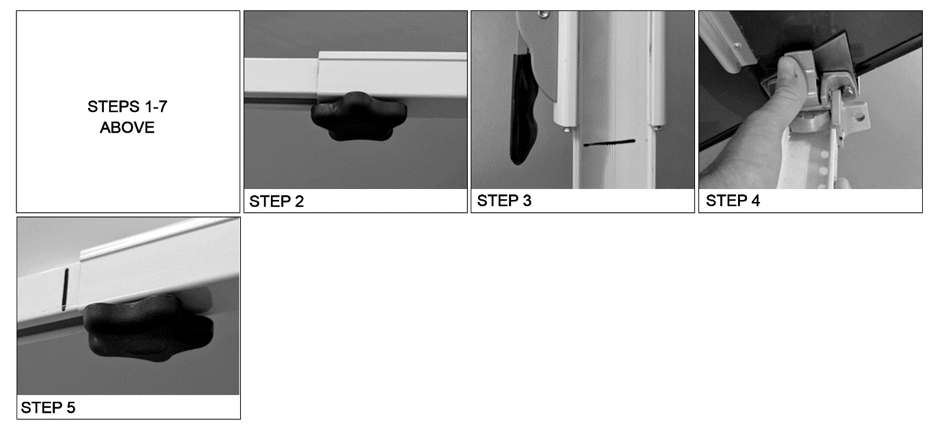
Awning Setup – Legs in Vertical Position

  • Perform steps 1 – 7 as above
  • Ensure black wheel is still loose
  • Adjust awning arm so it is level with black indicator line on the awning arms using the black lever
  • Release front and rear grey bottom clip, pushing awning leg outwards until it is level on the ground and awning is taut
  • Tighten black wheel
aor awning legs setup steps

Pull Down Awning

To put down reverse set up procedure outlined above.

Anti-Flap Kit Setup

Perform steps 1 – 7 in Awning setup as above.

  1. Pull drum leaver back whilst holding tension on the awning with the drum strap and pull back
  2. Lock the latch in line with the black dot on the end of the awning drum
  3. Tighten black wheel on front and rear awning arm
  4. Pull black leaver out and slide awning arm up to black line and lock both sides
  5. If you wish to put the awning legs down so they are vertical, do so now, otherwise they can be left in the up position. To put legs down, release front and rear grey clip and push awning leg outwards until it is level on the ground and awning is taut
  6. Slide awning arm out so that hole in the drum is exposed
  7. Hole needs to be sitting at 1o’clock
  8. Take the anti-flap kit out of bag and assemble by feeding the two parts together and ensure the black wheel is flush with the side
  9. Undo all 6 black leavers
  10. Attach the flattened clip end of the anti-flap kit to the roof and feed the metal spigot into the hole
  11. Tighten the black levers on the anti-flap kit
  12. Attach Velcro on end wall to the Velcro on the anti-flap kit – check it is firmly attached from both the inside and outside
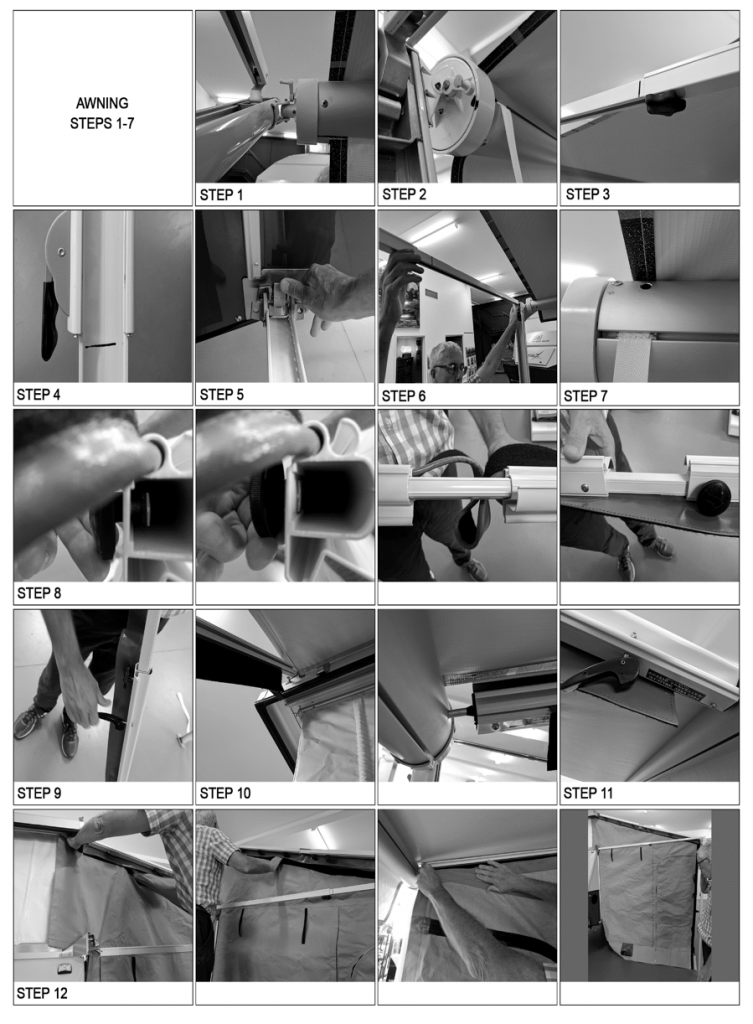
aor anti flap kit setup

Annex Set Up

  1. Annex walls are made to fit the trailer on level ground, so it must be levelled both front to back and side to side before annex is setup
  2. Set up awning to black paint marks on awning legs and spreader bars (marks on rear end of awning barrel must be aligned)
  3. Fit anti-flap kit as per instructions above
  4. Front and back end walls – attach Velcro at top of wall to Velcro strip fitted to the anti-flap kit. Start at the cut out on the wall for the trailer roof at the highest point working out towards awning barrel
  5. Slide Kedar (black spline) downwards into the sail track on trailer wall
  6. Long side wall – slide Kedar into the built-in sail-track on the awning barrel starting at the front end
  7. Attach the 3 Velcro tabs on side of end walls to the awning legs
  8. Fit draft skirt to the side of the trailer and attach Velcro at front and rear ends to the end walls
  9. Peg out the bottom of all walls and draft skirt using supplied pegs through the eyelets in bottom hem
  10. Use supplied ropes and pegs to secure awning legs
  11. Fit supplied annex mat to floor area

Note: Annex walls should not be left up in windy conditions. Please read awning instructions carefully.
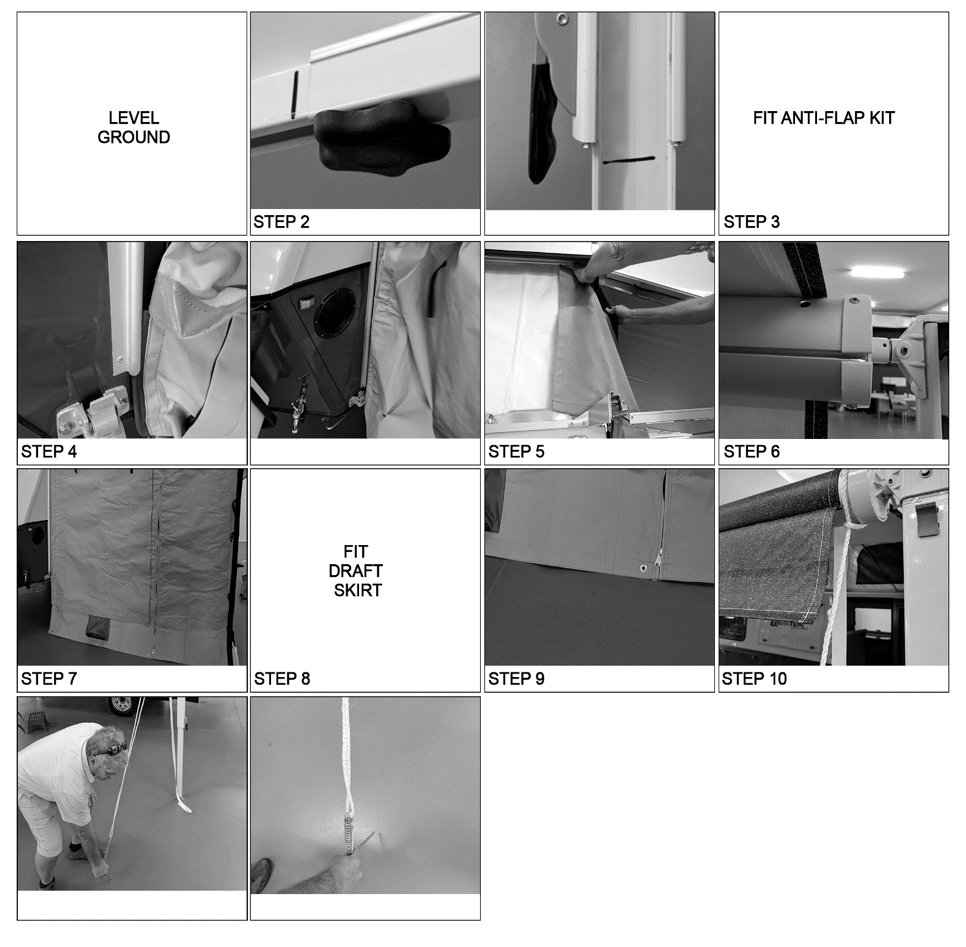
aor annex setup

  SHARE

Categories