GENERAL MAINTENANCE OF SYSTEMS & COMPONENTS
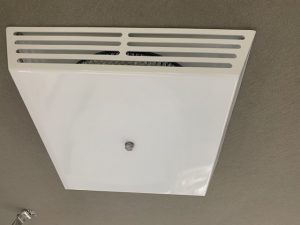
Air conditioner
The fluff filter (n) must be cleaned at least twice a year and replaced if necessary.
We recommend the particle filter (p) be replaced annually.
Positive Pressure System
The positive pressure system forces air under pressure into the cabin of the caravan whilst travelling. The air first passes through an automotive air filter, which filters out any dust, pressurising the interior to prevent dust ingress though doors or windows.
Depending on road conditions this filter may require cleaning and sometimes replacing. The filter can be removed by undoing the centre bolt (a 10mm spanner will be required), then lowering the white grille housing complete with the filter. After cleaning or replacing reverse this procedure to refit. Be careful not to over tighten the centre bolt.
Note: Take care when removing as the filter and housing may contain a substantial amount of dust.
Solar System
We advise you regularly clean your solar panels with a soft cloth and soapy water as they work more effectively when clean.
Locks and Slides
All outside locks, hinges and key entry points require regular lubrication. We suggest graphite powder as this does not attract dust. All slides for exterior kitchens, fridges and BBQ require regular lubrication with Inox or WD40.
Water Tank Protection Plates
Look for any visible leaks underneath the tanks or associated piping. Inspect the rivets to make sure they all appear to be well seated. A loose rivet will show up as having dirt gathered around the head of the rivet. Please replace the rivet ASAP. Inspect all water connections, intrusions into the tanks and piping for leaks. Leaks will show up as having gathered dirt or moisture around the leak.
Care of The Body of Your AOR Trailer
The body should be washed regularly with a ph. neutral carwash to maintain the original finish followed by a clean microfibre cloth or microfibre wash mitt. The use of a microfibre drying cloth will prevent streaking. The same process is to be used on the acrylic windows. This should be done in a cool shaded area.
Do not use truck wash. as it strips the wax from the van.
Do not use a pressure washer. The use of a normal garden hose with standard household pressure is sufficient
Apply tyre shine onto a microfibre cloth away from the caravan and wipe onto the wheel arch rubbers, mudflaps and tyres. Doing this process will extend the life of the rubbers and prevent deterioration
The fibreglass roof will require regular waxing as its exposed to the sun/ constant UV rays. This will help maintain the shine and keep your roof protected.
Important- if you have camped on or near the beach, on returning home, ensure the trailer is washed thoroughly (roof, body, undercarriage) to remove all sand and salt residue and apply a liberal amount of inox/silicone spray to the aluminium and stainless-steel surfaces
Upkeep and Maintenance Of Fibreglass Body
To maintain the fibreglass body’s durable gel coat finish a regular fine wax is required and application of wax every 2 to 3 months is required to keep your fibreglass protected from the elements. If you have had the ceramic pro coating applied no waxing is needed and a regular hand wash with a ph. neutral car wash followed by a clean microfibre cloth or microfibre wash mitt. And also, the use of a microfibre drying cloth gently drying the caravan. This coating has a 3-year warranty. Failure to maintain the coating will result in the warranty being void
Ceramic Pro Coating
Washing tips
- Avoid washing in direct sunlight to avoid water spotting.
- Hose down thoroughly to remove any loose contamination.
- Always use a pH Neutral car wash
- Reduce surface friction by using high quality microfibre wash mitts free of debris, never rub or scrub the paint.
- Always use a separate wash mitt or sponge for the wheels
- Work top down as heavy dirty and grime accumulates on the lower panels, rinse your wash mitt regularly to ensure dirt and grime is not being put back onto the fibreglass.
Drying tips
- Avoid letting tap water dry on the surface, as this may cause water spotting.
- Always use a soft microfibre drying towel free of debris, never rub or scrub the fibreglass.
- Avoid using leather or PVA chamois. A soft hand wash is the recommended method of cleaning your caravan. Automatic car washes, DIY brush washes or car wash cafes can cause damage to the coating due to abrasion.
Care of The External Kitchen Unit
We suggest you use a high quality stainless steel cleaner to clean the surfaces such as Hillmark Steel Kleen, available from appliance outlets such as Retravision. The stove is a high quality Thetford unit and spare parts are available from Thetford outlets.
Canvas Care
You will need to setup the roll out awning and annex and wet them down thoroughly before letting them dry. Repeat this process two or three times to allow the stitching in the seams to swell.
The canvas annex sections will absorb stains and dust over time with use but will tend to become more pliable and more waterproof. Canvas should be washed occasionally in clean water. Do not use bore water or harsh detergents. Allow to dry thoroughly in the sun before packing away. Remove any bird droppings as soon as they occur, as they will damage the proofing. This is often difficult on holidays so do this when you return home. Use a sponge to remove stains not a brush. Do not scrub the canvas as this will damage the proofing.
Proofing can be restored using a Spray or Brush-On Proofing available from camping stores. Keep naked flames away from canvas at all times.
Please avoid packing canvas/vinyl products up wet. Where you can, dry them down before packing away and allow to air. If packed up wet or damp always set products up to dry in the sun as soon as possible. And especially before packing away for long periods of time. Mould or mildew damage to materials that are not packed away in a dry state will not be covered under warranty. After each trip it can be a good idea to clean your products with warm soapy water and allow them to dry completely after rinsing them with clean fresh water.
NOTE: Care must be taken during times of high wind as damage can be done to rollout or main awning sections.
Awning
At each stop check the awning is well seated against the trailer and the black knobs on the inside of the awning arms are tight.
Suspension
Your AOR trailer has been fitted with a fully independent coil spring suspension. This unit is virtually maintenance free, however over time the control arm bushes may wear and produce uneven tyre wear. Minor wear can be adjusted with a wheel alignment as the suspension is adjustable for toe-in/toe-out and camber.
NOTE: Only AOR/approved agents should carry out this process. Deviation from this will void the warranty.
Shock Absorbers
The top and bottom shock absorber bolts are subject to wear as this is a moveable joint that takes all the pressure of the suspension. These two bolts should be removed and greased with Graphite Grease before and after major trips. If they show wear, replace the bolts and nuts and tighten.
CAUTION: After major trips, the bottom shock absorber bolts should be removed and the shock absorber fully extended and compressed to check it is still firm through its full length of travel. If needed the shock absorber should be replaced and all bolts fitted and re-tightened.
Tyres
The tyre pressure should be checked before and during major trips and kept at approximately 42 psi (290kPa) cold for sealed road touring only. Always check spare tyre pressure when possible and especially before major trips. Uneven tyre wear may indicate incorrect tyre pressure or worn suspension.
Spare Wheel
The spare wheel is located on the rear rack. To use, remove wheel cover and fixing bolt. Lift down from rack and lower the spare to the ground. Refit the spare wheel in the reverse order.
CAUTION: The wheel is heavy, lift or lower it carefully, preferably with assistance, to avoid injury.
Rear Bar and Wheel Carrier
The rear bar area should be inspected daily if travelling on corrugations or rough roads. The main area of concern is where the sides of the bar contact the fibreglass body of the trailer. Ensure the fibreglass is not showing any cracks or rub marks from beneath the side plates. Check the spare wheel to see if it is still solidly mounted to the rear bar. This can be done by hitting the wheel with your fist to see if it vibrates at the same frequency as the rear bar. They should both appear to be very solid together. You can also visually check the side of the tyre to see if it still maintains some crush distortion against the rear bar.
Water Filter Cartridge Replacement
We recommend changing your water filter cartridges every 6 to 12 months depending on the water quality. When changing the water filter cartridges, you should soak the new cartridges in a clean bucket of water for 24 hours before putting them int the trailer. This will help to prevent an air lock in the system. Please refer to the below parts numbers.
- Sediment Water Filter Cartridge:
- AOR Caloundra: 1-FIL-FIS-02. 10″x 2.5″ Poly Spun Sediment Filter 1 Micron. $36.30 each plus freight or fitment
- Bunnings Part Number: ,5090107 Stefani 5pm 250mm, 5090112 Stefani Twin Pack 5pm ppg-0510tp.
- Water System Australia: Sediment filter cartridge – 10″x 2.5″ 1 Micron (Nominal) Poly Spun Sediment Cartridge – GT2-1K
- Carbon Water Filter Cartridge:
- AOR Caloundra: 1-FIL-FIS-03. 10″x 2.5″ H2-Blue Carbon Block Filter 1 Micron. $36.30 each plus freight or fitment
- Part Number: 5091317 Stefani 250mm 5pm carbon block filter, 5090022 Stefani carbon 2pm filter, 5090114 Stefani green carbon filter.
- Water System Australia: Carbon filter cartridge – (CTO 2510-01) Pure Coconut Carbon Block Water Filter – 10″x2.5″ 1 Micron – GT4-6CTO